Leawo Photo Enlarger is simple and easy to use. You easily enlarge photos and increase image resolution with just a few clicks. With advanced AI technology, this photo enlarger will do everything for you quickly and intelligently. The following guide will show you how to use Leawo Photo Enlarger to process a single photo and a batch of photos respectively.
Step 1: Import source photos
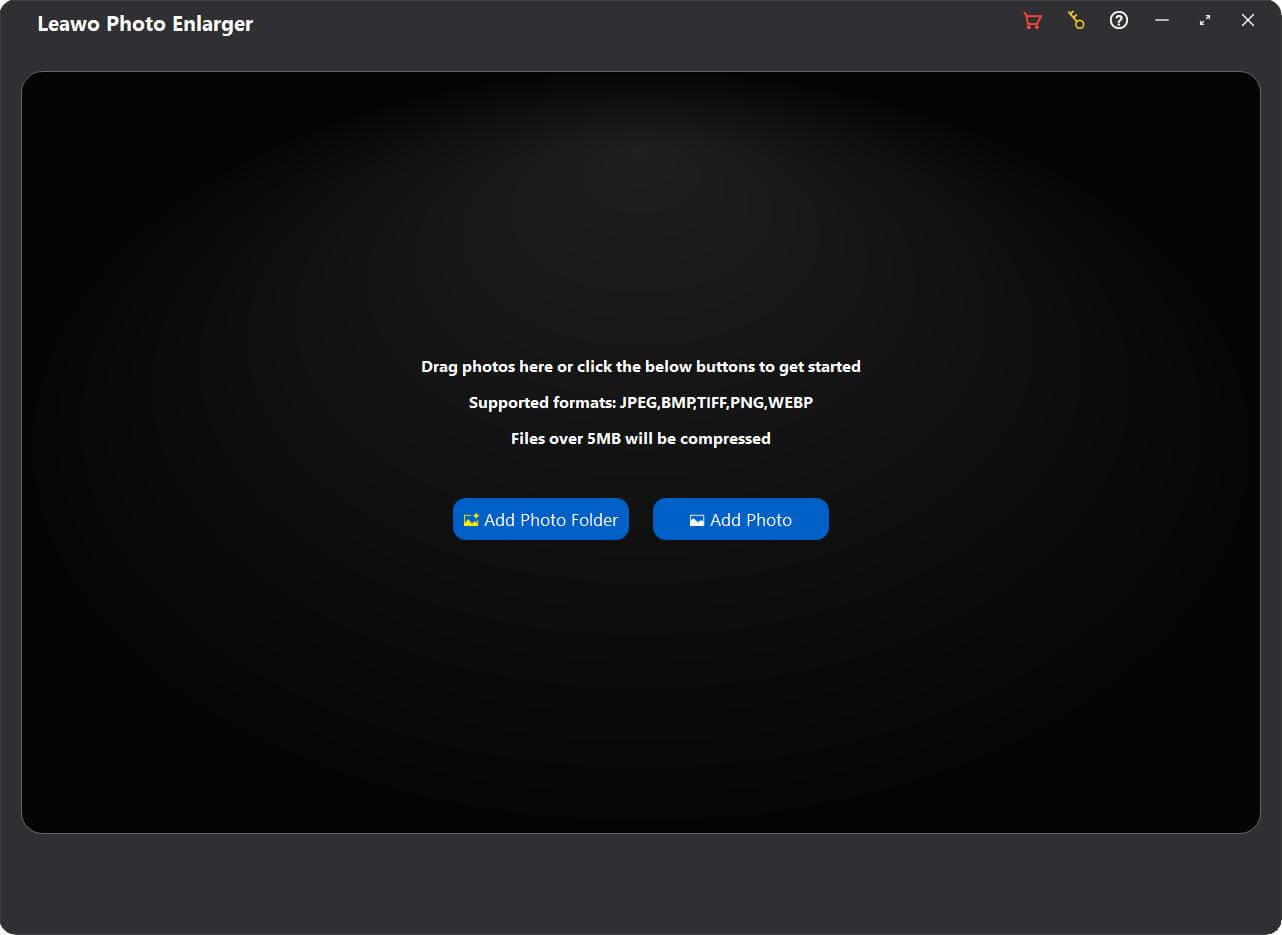
To upscale your photos with this AI photo enlarger, first you need to add source photos into Leawo Photo Enlarger. Kick off Leawo PhotoIns and enter the Photo Enlarger module. Then, follow either way listed below you to add images for photo enlargement:
![]()
- Click the “Add Photo Folder” button
![]() or the “Add
Photo” button
or the “Add
Photo” button ![]() to browse and load source photo
folder or photos from your computer hard drive into Leawo Photo Enlarger.
to browse and load source photo
folder or photos from your computer hard drive into Leawo Photo Enlarger.
- Directly drag and drop your source photos into the main interface of
Leawo Photo Enlarger.
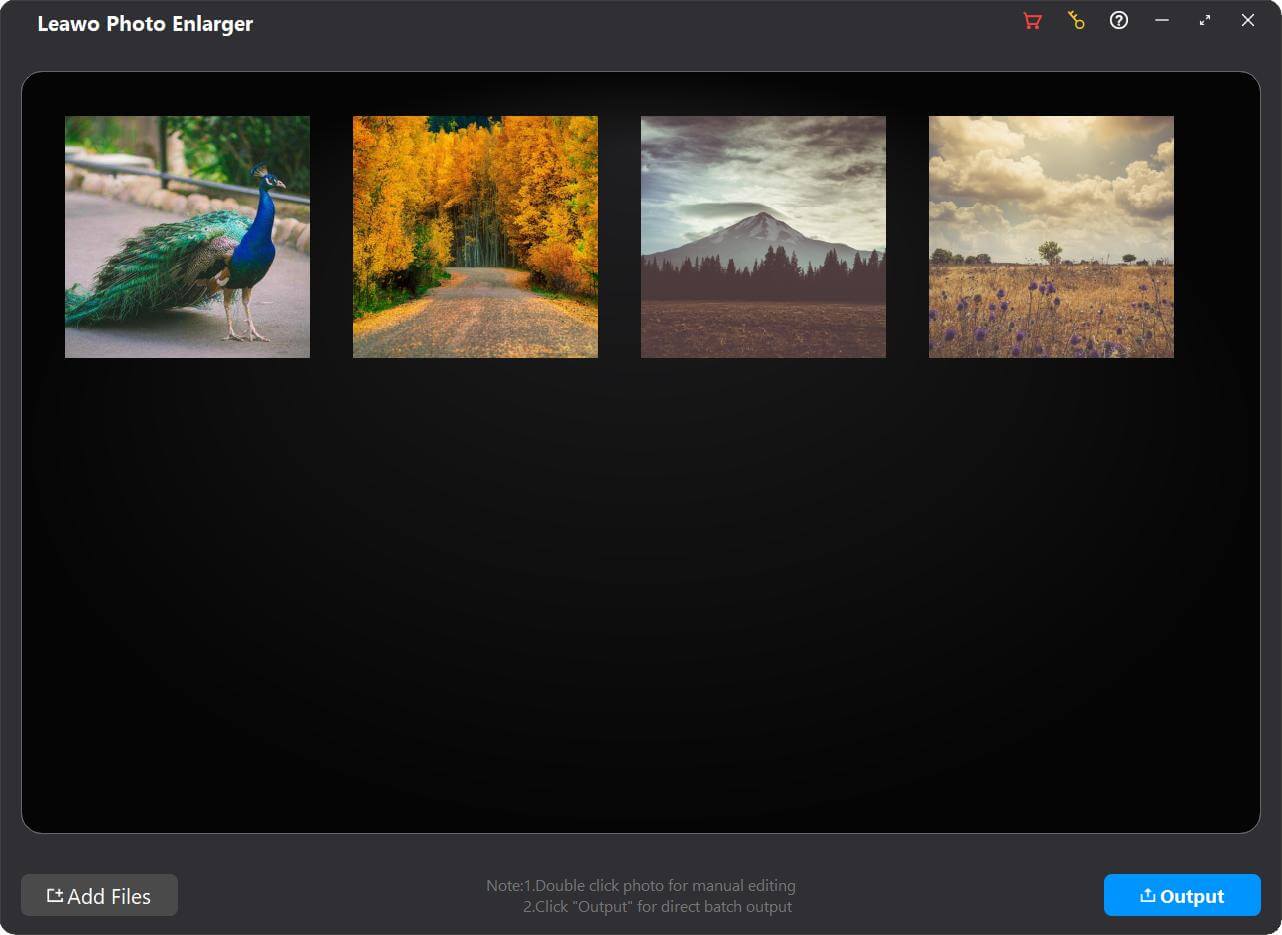
Once you have loaded photos, you can right-click on a photo, and then choose to delete or export the selected photo. By right-clicking on the blank space, you can delete or export all loaded photos. If you want to import more photos, click the “Add Files” button ![]() in the bottom-left corner to add more photos for photo enlargement.
in the bottom-left corner to add more photos for photo enlargement.
![]()
Step 2: Enlarge photos
After loading source photos, Leawo Photo Enlarger enables you to upscale photos in batch or enlarge photos one by one through the internal AI photo enlarger.
1. Enlarge photos in batch
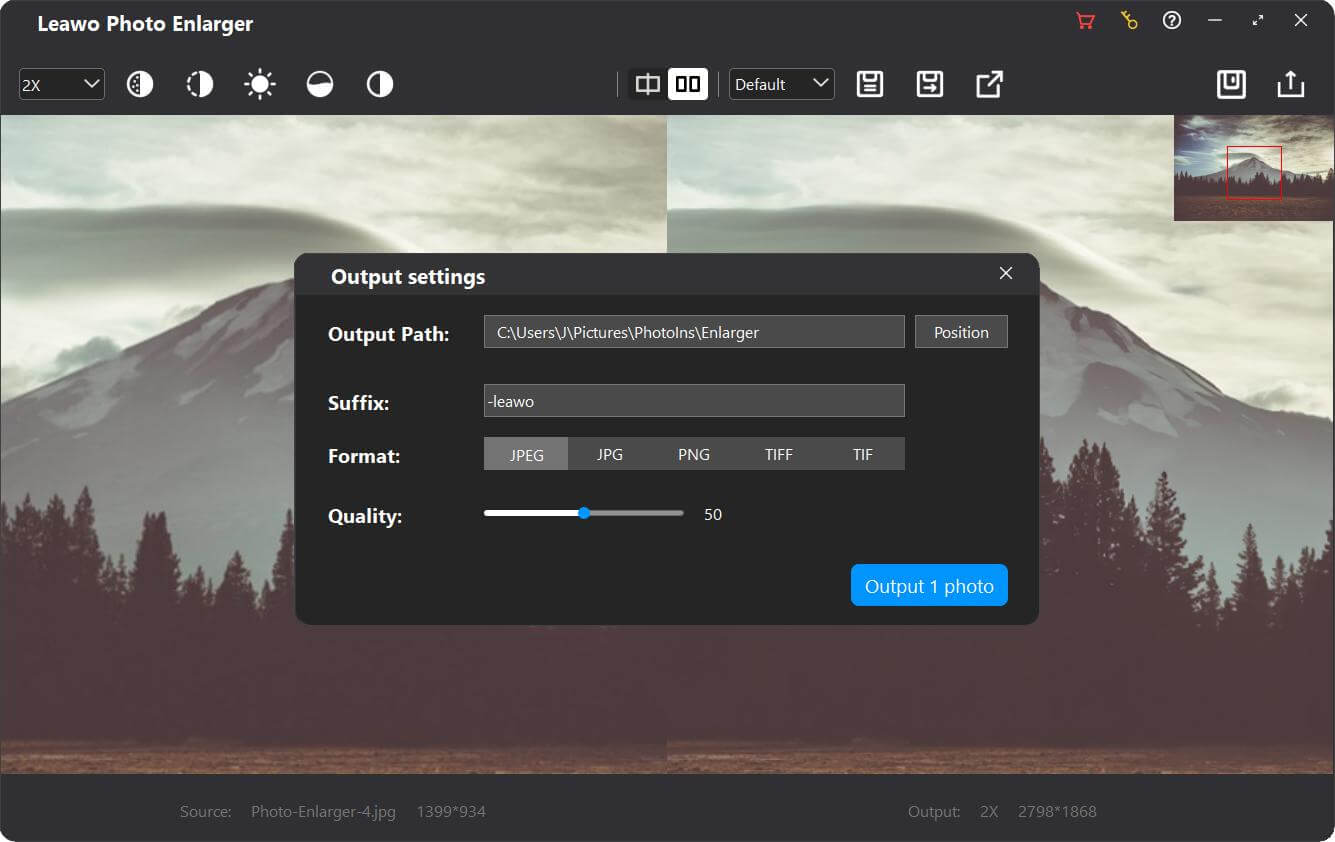
To enlarge all loaded photos in batch, click the “Output” button ![]() in the bottom-right corner to call out the “Output settings” panel.
in the bottom-right corner to call out the “Output settings” panel.
![]()
- Output Path: By default, output photos will be
automatically saved to the
address in the box. You can also click the “Position” button
![]() to change the output directory.
to change the output directory.
- Suffix: Add suffixes to original file names.
- Format: Specify a format from JPEG, JPG, PNG, TIFF and
TIF for the output
images.
- Quality: Set quality of the output photos. If you choose
JPEG or JPG as
the output format, you can set image quality from 0 to 100. If you choose PNG as the output format, you
can set compression ratio from 0 to 9. If you choose TIFF and TIF as the output format, you can choose
compression algorithm between LZW and ZIP, and choose bit depth between 8 bit and 16 bit.
- Scale: Choose enlarging scale from the preset 0.5x, 2x,
4x and 6x
buttons. Or, enter the any scale you want to enlarge in the box behind (the value should be between 0.5
and 40).
- Denoise: By default, the values of “Suppress Noise” and
“Remove Blur” are
both 50. You can drag the sliders from 0 to 100 to remove digital noise and adjust clarity upon your
images as needed.
- Effect: By default, the values of “Brightness”,
“Saturation”, and
“Contrast” are all 50. You can drag the sliders from 0 to 100 to enhance image quality as needed.
- Preset: Click the “Save” button
![]() to save all changes. Or, click
the “Save as” button
to save all changes. Or, click
the “Save as” button ![]() to save preset parameters for further use. You can click on the headmost box
to save preset parameters for further use. You can click on the headmost box ![]() to select a saved preset from
the drop-down list.
to select a saved preset from
the drop-down list.
After all settings are completed, click the “Output [number] photos” button to output all AI-enlarged photos at once.
2. Enlarge photo one by one
To enlarge photo one by one, double-click on a loaded photo to enter the workbench of Leawo Photo Enlarger, which is divided into 3 sections:
![]()
At the top left, you can set enlargement parameters for the photo:
- By default, after entering the workbench, your photo will be upscaled to
2x. To change the enlarging scale, click the headmost box, and choose a preset scale from 0.5x, 2x, 4x,
6x, and 8x. Alternatively, you can enter the any scale you want to enlarge in the box (the value should be
between 0.5 and 40).
- To remove noise from the photo, click the “Denoise”
button
![]() to adjust the
noise reduction degree.
to adjust the
noise reduction degree.
- To fix blurry and pixelated photo, click the “Deblur”
button
![]() to adjust the
clarity and sharpness degree.
to adjust the
clarity and sharpness degree.
- Click the “Brightness” button
![]() to adjust the brightness of the
photo. By dragging the slider to the right end for the brightness effect.
to adjust the brightness of the
photo. By dragging the slider to the right end for the brightness effect.
- Click the “Saturation” button
![]() to adjust the saturation of the
photo. By dragging the slider to the right end to maximize the saturation of the photo.
to adjust the saturation of the
photo. By dragging the slider to the right end to maximize the saturation of the photo.
- Click the “Contrast” button
![]() to adjust the contrast of the photo.
By dragging the slider to the right end to maximize the contrast of the photo.
to adjust the contrast of the photo.
By dragging the slider to the right end to maximize the contrast of the photo.
In the top middle, you can switch the photo preview mode, and save/apply preset:
- By default, the enlarged photo is previewed in “Side-by-Side” mode. You
can click the “Split” button
![]() to change the preview mode to “Split” mode.
to change the preview mode to “Split” mode.
- Click the box
![]() next to the “Side-by-Side”
button, you can select and apply a saved preset from the drop-down list to the photo.
next to the “Side-by-Side”
button, you can select and apply a saved preset from the drop-down list to the photo.
- Click the “Save preset” button
![]() to save all enlargement parameter
changes.
to save all enlargement parameter
changes.
- Click the “Save as preset” button
![]() to save the parameter preset
applied to this photo for further use.
to save the parameter preset
applied to this photo for further use.
- Click the “Apply to All” button
![]() to apply the parameters of this
photo to all loaded photos.
to apply the parameters of this
photo to all loaded photos.
At the top right, you can save all changes and go back to the main interface of Leawo Photo Enlarger, as well as output this photo individually:
- Click the “Save” button
![]() to save all changes to this photo. Then, you can
click the “Close” button
to save all changes to this photo. Then, you can
click the “Close” button ![]() to close the workbench and go back to the main
interface.
to close the workbench and go back to the main
interface.
- Click the “Output” button
![]() to call out the “Output settings” panel:
to call out the “Output settings” panel:
![]()
- Output Path:By default, output photos will be
automatically saved to the address in the box. You can also click the “Position” button
![]() to change the
output directory.
to change the
output directory.
- Suffix: Add suffixes to original file names.
- Format: Specify a format from JPEG, JPG, PNG, TIFF and
TIF for the output images.
- Quality: Set quality of the output photos. If you choose
JPEG or JPG as the output format, you can set image quality from 0 to 100. If you choose PNG as the output
format, you can set compression ratio from 0 to 9. If you choose TIFF and TIF as the output format, you
can choose compression algorithm between LZW and ZIP, and choose bit depth between 8 bit and 16 bit.
After all settings are completed, click the “Output 1 photo button
![]() to output the AI-enlarged photos individually.
to output the AI-enlarged photos individually.
Step 3: Output AI-enlarged photos
Finally, after clicking either “Output [number] photo(s)” button
![]() on the main interface or the workbench, you will be led to the exporting window. During the exporting process, you can click the “Cancel” button
on the main interface or the workbench, you will be led to the exporting window. During the exporting process, you can click the “Cancel” button
![]() in the bottom-right corner at any time to terminate the enlargement. Once the exporting process is complete, you can click the “Open Save Folder” button
in the bottom-right corner at any time to terminate the enlargement. Once the exporting process is complete, you can click the “Open Save Folder” button
![]() to open the output directory.
to open the output directory.
![]()
Note: If you are a trial user, you will receive a “Get Pro” prompt, reminding you that the free trial version only outputs one photo at a time. You can click the “Continue” button
![]() to continue outputting the first photo. Plus, a Leawo watermark will be added to the output photo. You can click the “Buy Pro” button
to continue outputting the first photo. Plus, a Leawo watermark will be added to the output photo. You can click the “Buy Pro” button
![]() to upgrade to the Pro version and unlock all premium features.
to upgrade to the Pro version and unlock all premium features.
![]()
 in the bottom-left corner to add more photos for photo enlargement.
 in the bottom-right corner to call out the “Output settings” panel.
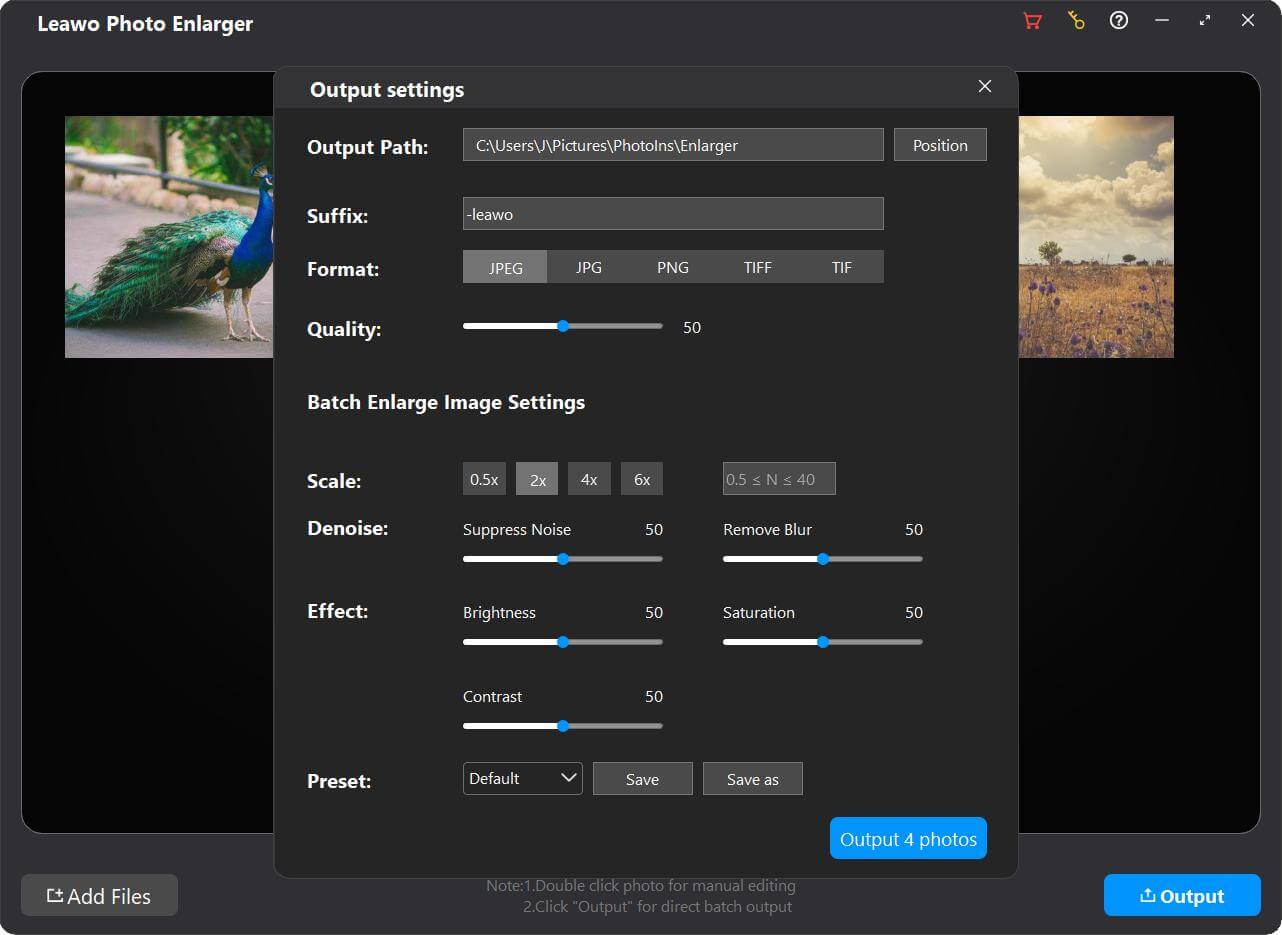
 to output the AI-enlarged photos individually.
 in the bottom-right corner at any time to terminate the enlargement. Once the exporting process is complete, you can click the “Open Save Folder” button
 to open the output directory.
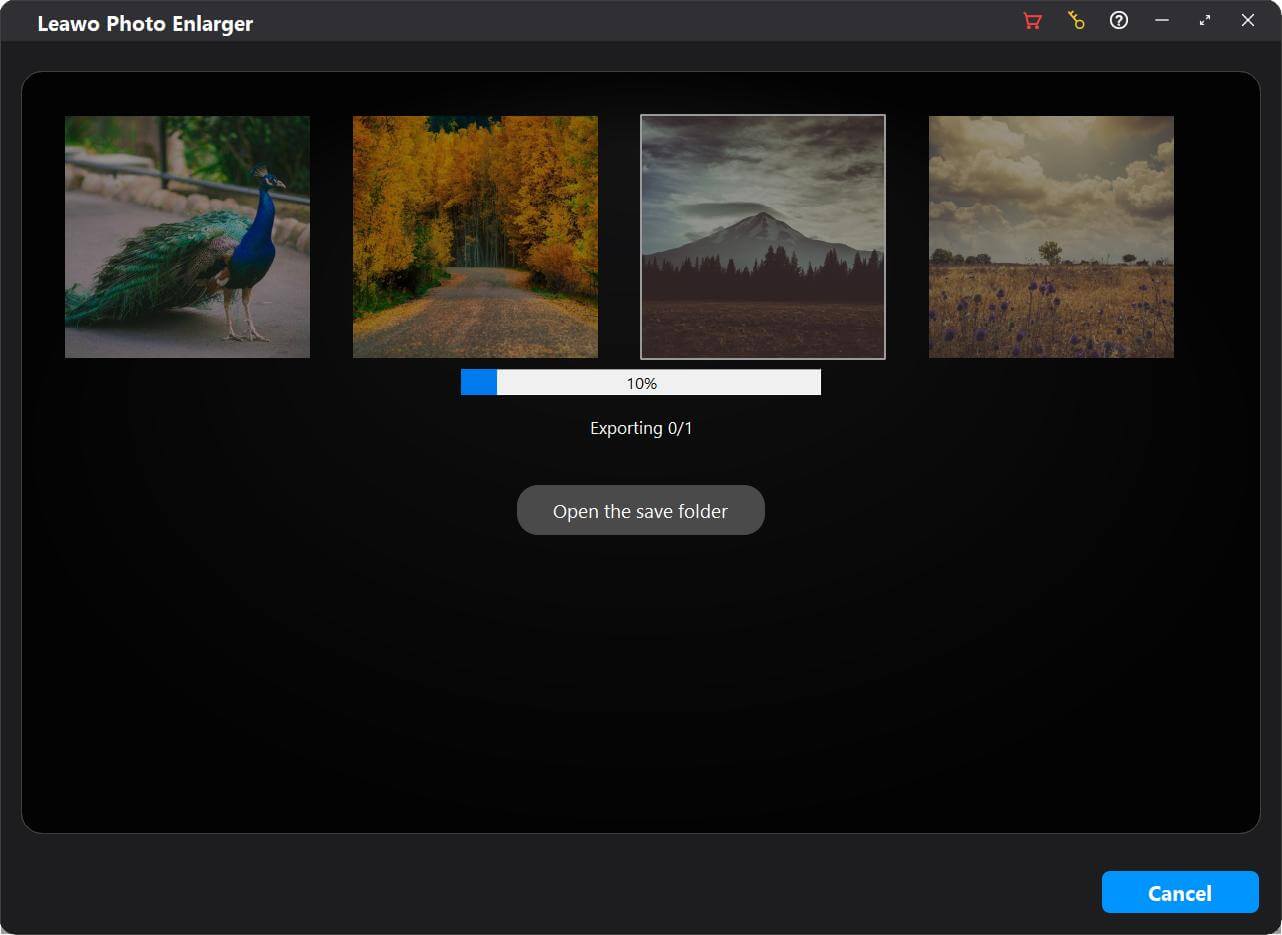
 to continue outputting the first photo. Plus, a Leawo watermark will be added to the output photo. You can click the “Buy Pro” button
 to upgrade to the Pro version and unlock all premium features.
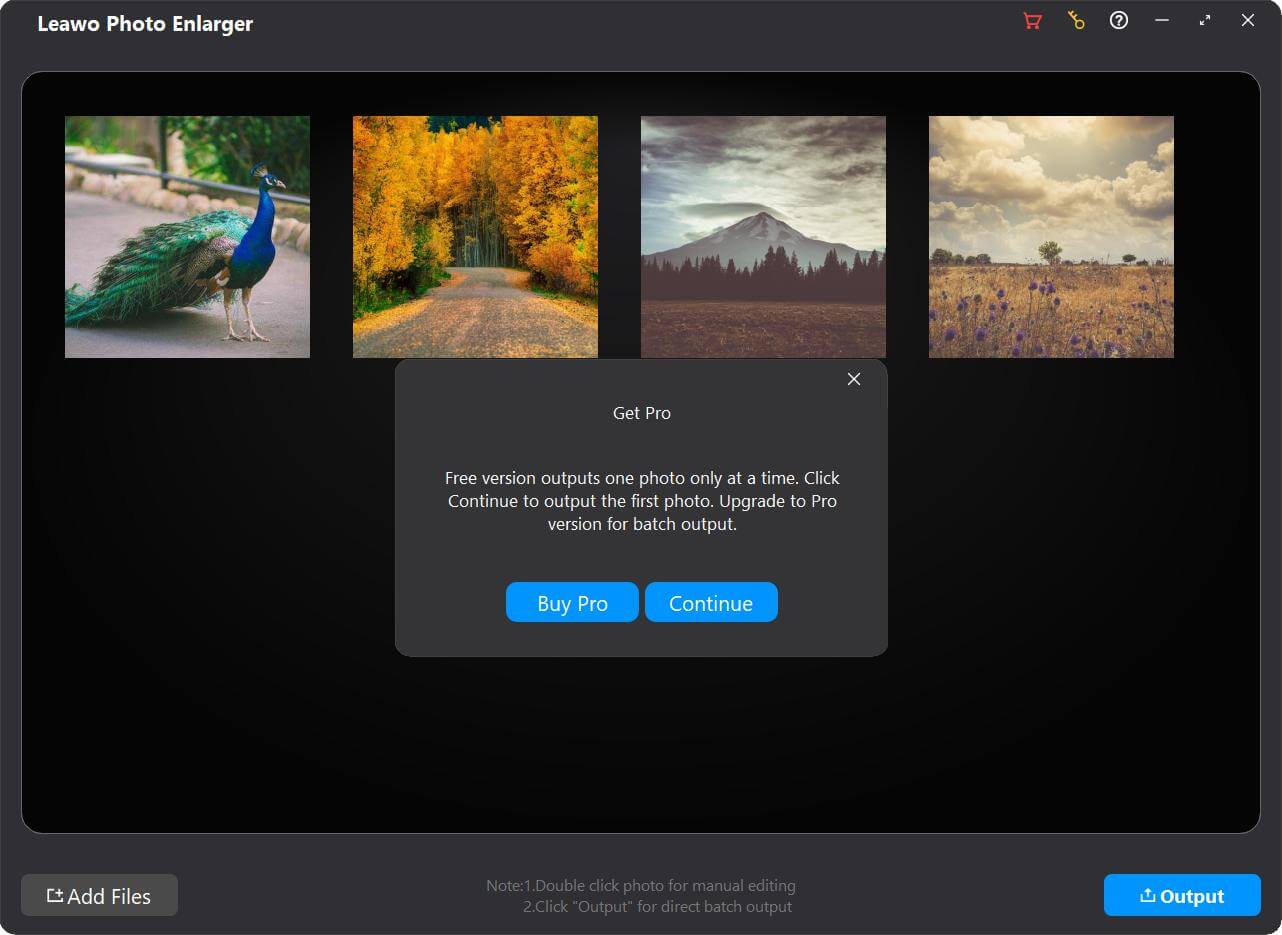
 [12/29/23] MAX Downloader V15.0.0 NEW
 10,000,000 people are using
Leawo!
10,000,000 people are using
Leawo! All Transactions are
protected!
All Transactions are
protected! 30-Day Money Back Guarantee!

 or the “Add
Photo” button
or the “Add
Photo” button  to browse and load source photo
folder or photos from your computer hard drive into Leawo Photo Enlarger.
to browse and load source photo
folder or photos from your computer hard drive into Leawo Photo Enlarger. to change the output directory.
 to save all changes. Or, click
the “Save as” button
to save all changes. Or, click
the “Save as” button  to save preset parameters for further use. You can click on the headmost box
  to select a saved preset from
the drop-down list.
to select a saved preset from
the drop-down list. to adjust the
noise reduction degree.
to adjust the
noise reduction degree. to adjust the
clarity and sharpness degree.
to adjust the
clarity and sharpness degree. to adjust the brightness of the
photo. By dragging the slider to the right end for the brightness effect.
to adjust the brightness of the
photo. By dragging the slider to the right end for the brightness effect. to adjust the saturation of the
photo. By dragging the slider to the right end to maximize the saturation of the photo.
to adjust the saturation of the
photo. By dragging the slider to the right end to maximize the saturation of the photo. to adjust the contrast of the photo.
By dragging the slider to the right end to maximize the contrast of the photo.
to adjust the contrast of the photo.
By dragging the slider to the right end to maximize the contrast of the photo. to change the preview mode to “Split” mode.
 to save all enlargement parameter
changes.
to save all enlargement parameter
changes. to save the parameter preset
applied to this photo for further use.
to save the parameter preset
applied to this photo for further use. to apply the parameters of this
photo to all loaded photos.
to apply the parameters of this
photo to all loaded photos. to close the workbench and go back to the main
interface.
to close the workbench and go back to the main
interface. to call out the “Output settings” panel:
 Prof. Media 13
 Blu-ray Ripper
 Blu-ray Copy
 Prof. DRM